


|
The very basics Inexpensive
microscope kits specially designed for children are available.
These can provide a good introduction to science in general and
microbiology in particular. Kits often come with books of
experiments and the necessary accessories to do them, including
stains and slide making sets. With this little plastic microscope
it is possible to see cells structure, protozoa and algae filaments.
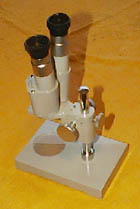
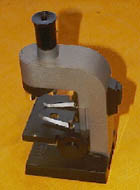
Microscopes open the door to the world of Microbiology. Special microscopes for use by student of all ages are available from science equipment suppliers. These are about the same cost as a good quality camera, and will be in the price range of keen individuals and most schools. Ideally the microscope should have a magnification of at least X50. This should enable you to see detail in cells and protozoa. |
|
 |
 |
To look at bacteria and smaller microbes a magnification in excess of X500 is preferable.


Bacteria on a pin head. (Left) X100 (Right) X5000.
© 1999 The Centre for Microscopy and Microanalysis
Hygiene
Take sensible precautions such as washing hands
after handling soil and pond water. Do not put these substancesin
your mouth. If you allow bread to go moldy, keep it away from other
food and dispose of it safely after your examination. And again,
wash you hands.
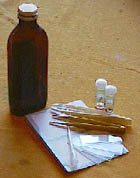
Accessories
|
You will find the following accessories helpful:
|
Techniques
You will need to learn how to focus and how to
adjust the light on your microscope. Lighting is very important
and gettingthis
right can make all the difference to your view. You will get the
hang of it by trial and error. The instruction booklet with the
microscope may help you master the basics, if not then your teacher
may be able to help. Or you may even find that your parents may
know what to do....
On
some microscopes it is possible to change the magnification. Experiment
with this. You will soon learn though, that the biggest magnification
doesn't always give the best view, though!
 |
Hooke observed the first cell in cork-bark, and produced drawings of the cell structure that he saw. You can repeat his experiment, but use leaves instead of cork. |
| Collect a fresh leaf from a tree and a dead leaf (from the same tree) from the ground look at. Look at each in turn under the microscope. Depending upon the type of microscope you are using you may be able to simply place the specimen on the viewing stage and look at it. If the view isn't good enough, make a microscope slide of your specimen. | |
| Draw what you see using colored pencils. Can you see any differences between the live and dead leaves? Draw them and indicate them on your drawings. Start with a magnification of X50 or X100 if you can change the power of the microscope. | |
|
Now let us look at the leaf cell. A higher magnification may now help see more detail. Draw the cell you are looking at. Can you identify the following: The cell wall. The Nucleus. The Chloroplast. |
|
Project 2: Water
|
Now collect samples of water from outdoors (eg a puddle, a stream or a pond) or from different depths in tropical fish tank. If it is dirty all the better, but be sure to wash your hands after collecting it and after doing the experiment. Label each, recording the origin and date collected. |

Protozoa: Ameba (magnified) |
|
Put a drop of water from a sample onto a glass microscope slide with an eye-dropper and examine it through the microscope. Identify what you see. The images above and below may help.
|
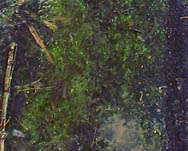
Algae: Spirogyra (life size) |
|
You may be able to identify protists (protozoa) and algae in the water. They may be alive and moving. If they move too fast add some gelatin to the water to thicken it and that will slow them. |
Project 3: Fungus
|
If you allow a piece of bread to go moldy you can examine the minute fungal spore-caps under the microscope. These are raised on tiny stalks, just as with mushrooms. The spores are released into the atmosphere from time to time and these are the "seeds" of new fungal colonies. They drift and settle. If the material they settle on is damp and/or organic a new fungal colony may appear. You should also be able to see the hyphae, which are thread-like structures that spread throughout the moldy areas, linking the stalks. These hyphae burrow into the bread like plant roots. They excrete enzymes that dissolves the bread, and the resulting goo is re-absorbed by the mold as food. |
|
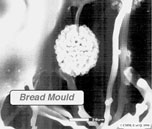 
(Left) Bread mold spore X500 (Right) Mold on chopped tomatoes. (life size) (Left) © 1994, The Centre for Microscopy and Microanalysis (Right) S Hodges, 2000 |
|
Often,
a microbiologist will need to keep a permanent sample and record
of his or her work. This can be done by making a microscope
slide or mount. You can make dry or wet mounts,
depending on the type of specimen and its environmental medium.
Dry mounts can be retained almost indefinitely and can be made as
follows. Alternatively a wet mount can be made by squashing a specimen between two pieces of glass with a water or another liquid medium. The edges of the glass can then be held together with tape if necessary, though most temporary wet mounts should stay together by surface tension effects of the liquid. |
|
A microbiologist may need to improve the clarity of what is being studied though the eyepiece, so the technique of staining a specimen can be applied. Sometimes specimens are so thin no detail can be seen. They are almost transparent. Specimens can be stained to enhance their clarity, so they stand out more easily when viewed. Different parts of a specimen will absorb the stain at different rates, so some parts will be more colored than others, which will help you to see more detail. Different specimens will need different amounts of stain and different staining times. Apply the stain in small quantities with an eye-dropper. Leave it for around half a minute then soak up excess with blotting paper. Trial and experience will help you to learn how much stain to use and how long to soak a specimen. Several types of stain are available, and these can be obtained from science equipment suppliers or pharmacies ( for example Fuchsin, Eosin and Methylene Blue). Fuchsin is probably the easiest to use. |
![]()
Microbiology
QX3
Computer Microscope
Microscapes
Space Station
Biomedical Lab
Teachers Wormhole
Go
to
Home
| Space Station
| Mars | Rainforest
© 1999 Satellite Events Enterprises Inc.